Fixing Cornice

How to Fix and Apply Cornice Ceiling Features in 12 Steps

How to Build and Install an Upholstered Window Cornice Box

How to make an easy DIY window cornice Window cornices

Project Cornice of Crown moulding over door Paint trim

Coving Plaster Cornice Plaster Mouldings UK Coving

Rug Fail and Fix… and Pelmet Boxes

The present guide will teach you how to repair any broken plaster cornice that you may have in your house.
Fixing cornice. Egg & Dart Ceiling Rose. Usually it is because a wall isn't straight or its a heavy decorative type. Fixing a Plaster Cornice Plaster cornices make up the caps and mouldings of many homes, adding decorative touches to areas of the home that may be dull or overlooked. Cornice tends to be available in standard lengths, with 3m being a popular option.
Use the caulking gun to apply a bead of Liquid Nails Fast to the top and bottom of the back of the cornice surface.; It is critical to understand that stud adhesive on its own DOES NOT constitute a fixing system and MUST be used in conjunction with screws or nails.. Coving shop products assist in many ways, the Architectural and Building industries. Easy Fit Cornice Fixings.
If the plaster is tough use an abrasive blade in your cutting tool to cut through just the plaster, stop when you hit the laths. Click the product images below left to view. With a wet sponge, clean the damaged area from any dirt and loose plaster particles. 3D VIEW means that you can view product in 3D (in a pop up window) » click to install 3D View Plugin.
Posted on 19/01/2017 by Ambrose Building.. Step 1 - Make Requisite Preparations. Projection is the distance between the wall and the outside edge of the cornice on the ceiling wall. Planning & Projects How to create a green wall using artificial hedge Green walls are all the rage at the moment, but buying and maintaining one can be costly.
The overall cost of the renovation is about $6.3 million with the portico and cornice repairs costing about $3.75 million. 750g Ceiling Rose & Corbel Fixing Materials. Be careful not to apply too much so it does not creep out from under the edge of the ceiling centre. Compatible with all cornice profiles, these fixings will make it easier to fit a cornice where ceiling space is limited.
It is also used for finishing cornice joints and mitres. Remove excess cement with scraper and use to fill screw heads. Use scraper to fill gap between cornice and ceiling with cornice cement. Take care to prepare the ends of any butt joints so they will accurately butt together.
Plaster coving and plaster cornice, plaster dado rails or plaster ceiling roses are green products. Depth is the distance between the ceiling and underside edge of the cornice on the wall. Reduce fitting time when installing a cornice by using these easy fit cornice fixings. Gypsum plaster is a natural resource, non-hazardous and non.
Leave cornice cement for a few minutes to start setting, then. Plaster cracks can appear in any house and on any plaster wall and ceiling. With basic interior products, being manufactured from a formulation of Gypsum plaster and water. Cornice fixing instructions with pictures.
Bring surfaces together as soon as possible within 10 minutes. Cornice Mouldings - Fixing Details Loft Access Door 1 Hour Fire Rated - Installation Full Columns - Fixing Details Half Columns - Fixing Details Gallows Brackets - Fixing Details Interior Coving - Installation Instructions Plastic Ceiling Roses - Installation Instructions Dentil Mouldings - Typical Fixing Detail Push the ceiling centre into the required position on the ceiling and hold for a few minutes. I used a powder type conice cement mixed to a paste placed along the top & bottom internal curves & then secured with the occasional plasterers nail.
Make sure both surfaces are clean, dry and free of oil, grease and dust. See Fixing Coving Using Adhesive below – after we look at a couple of alternatives for cutting coving. 600 mm centres ceiling and wall Fixing Instructions Plaster Cornice It is important to understand when cutting plaster cornice about the projection and depth of the cornice.
Plaster mouldings including Ceiling Roses, Corbels, Cornice and fire surrounds, all hand made in Yorkshire. The pack contains five fixings, which are designed with fast fitting in mind. If you’re using a dry Gyprock Cornice Cement, mix with water Take the scissors and cut the Styrofoam in approximately the same size as the missing cornice part.
Unit 3068 / 25 Ralph Street, Alexandria, NSW 2015. Using a “Wonder Mitre” to Cut Coving If you don’t want to use a mitre block to cut coving, then you could try a coving mitre tool called a Wonder Mitre which is a simple guide that sits on the inside of the cove and has shaped notches. Apply cornice adhesive around back perimeter of ceiling centre. Mix cornice cement in bucket to form a paste.
BTW I never pin cornice unless I absolutly have too. Last Updated on July 30, 2019. They can be found in cornices, internal walls, plaster joints and above windows and doors and they will appear as a result of house movement. FIXING CORNICE Once your cornice lengths are cut, check that the lengths and corner cuts are correct before you start applying any adhesive.
Gyprock Cornice Cement is used for fixing Gyprock cornice at wall and ceiling junctions where the substrate is plasterboard or fibre cement. How to repair plaster cracks. Fix cornice with countersunk drywall screws at app. First, use a small chisel to carefully chip away the edges of the crack, resulting in a more even surface, and then sand away any lumps so that the area is smooth.
Use drill to screw plasterboard screws up through cornice into ceiling so cement oozes out of crack. Cut the cartridge tip and the nozzle to about 5mm. Why not have a go at creating your own using pieces of artificial hedge – it looks great and will last the distance. Posted June 11, 2014 filed under Tips and Advice..
Mix dry cornice adhesive to the instructions on the packaging. While cornices add elegance and sophistication to decor, the plaster still is susceptible to damage from str If this is the case the old plasterboard ceiling and cornice will need to be removed before installing new sheets and cornice. Fixing Cornice Installation Instructions Cornice Installation Video.

Pin on Favorite Places & Spaces

DIY Foam Board Cornice Window Treatment My next big

cornice molding to cover vertical blind headers Vertical

Wood Window Valance With Crown Molding Breathtaking Wooden

How to Build Window Cornices The family handyman

cornice boards pinterest Wood Cornice Boards Classy
cornice molding to cover vertical blind headers decor
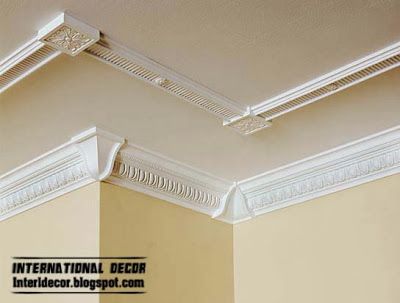
plaster cornice, ceiling cornice designs, gypsum cornice

Pin on Home decor ideas

cornice molding to cover vertical blind headers Window

Here's the crosssection of the cornice. Who's

ceiling crown molding french Crown Molding, Decorative

8. corniceboardeasydiymadefromfoamboardsand
